In this tutorial we created a rocket using only 4 shapes, and a pear mesh using the mesh tool and eye dropper tool to fill colour and the appearance panel to make the different textures of the rocket.
To create the rocket we created 4 simple shapes.
1) Rocket itself
2) Window
3) Wings
4) The squared pattern
To create the rocket we using the Pen tool, we then manipulated the outline by adding anchor points and changing directions to create a curved point and a base for our rocket. After this we curved in the edges by adding another anchor point and rounding it off by dragging the anchor point down. We did the same for the bottom curve. We used the pen tool to freehand the wings of the rocket, then edited it with the direct selection tool and anchor points to make the wing look more like a realistic wing of a rocket.
After this we added a dotted line in the shape, by going to the appearance panel and making a new stroke, with this stroke we then selected 2px thickness this gave us a solid line which ran around the rocket, we made a dashed line simply by selecting "Dashed line" we selected a "minus" offset stroke which meant the stroke would appear inside the rocket.
We then created the wings using the Pen tool creating a basic wing shape a duplicating it to create two wings for the rocket. After making the wings we made the pattern for the inside using the appearance panel to create an offset pattern which we then put into the rocket itself.
A white rectangle and two overlapping green rectangles, this made the crosshatching pattern that would be inside the rocket itself. After we added this we used the appearance panel to create the inner dashed lines, we used the same effect on the window which we created using the ellipse tool and finished our rocket off by adding a drop shadow creating an atmospheric effect.
The Pear:
To create the pear we used the mesh tool, we started with a rectangle and added a mesh to said rectangle, we then moved the mesh around so that it was roughly the same shape as the pear. After we had our mesh in place we added anchor points spanning across the pear mesh which allowed us to be able to render our pear.
We used the eye dropper tool on each and every anchor point we created, this proved to be quite a daunting task because of the amount of anchor points we created; going through each anchor point was a bit of a pain. But the end result was a good one, once we had rendered our pear we found a texture from the internet. I used the texture of a pear I found in the hope that it would more realistic, I was right and the pear was finished. Overall I was happy with the outcome and both tutorials as
a whole.
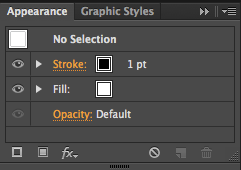
 This is the appearance panel which we used, in these set of options were different settings which allowed us to change things like the stroke of an object, the fill and many more options which allowed us to create patterns out of shapes and offset paths like the dotted lines which went inside my rocket.

No comments:
Post a Comment