Friday, 28 November 2014

Foldouts- Research into a new idea!


I have found some fold out booklets and design which I have researched on various different pages, I have also analysed what types of design would benefit my project and the direction in which I want to take it. 
I am happy with what I have found I believe it can really benefit me and help me move on with my project looking at layouts and how they are put together will also help me in future developments.

TRAILOR PHOTOGRAPHS


Here are my Photographs for my horror film I am going to create in After Effects, I have taken a lot of the Photographs in a dark setting to enhance the appearance of the horror film I am going to make. 


"Chosen Concept"

This is my chosen Concept page, I chose to create a fold out book which will inform tourists of different information about the architecture and the things they will find in Perth. 
I will use the reference photographs I have already gathered in my primary research to illustrate from, I will add text and information about chosen illustrations which will inform and 
entertain my audience.

"Who's my Audience"

This is a page from my InDesign document when I decided who my audience was, I decided that my aimed audience would be Tourists 16 years and over. 

Wednesday, 26 November 2014

Portfolio


Here is a small portfolio of some of the work I have created over the last two years at college and in my first few months at Huddersfield University. 

1) "JukeBOX" is a design I created in my free time, I was inspired by SWERVE and St Bradbury to create this illustration. I used the pen tool to create this entire design on Adobe Illustrator I am happy with the outcome to colours work well together the font works well with the design and the colours compliment each other well which helps the design fit together nicely. 

2) "Lightbulb growth" is a piece I made while in University it was an Adobe suite tutorial that we created that started off as individual layers in Photoshop. I used a many different varieties of tools and effects to create this like the Merge tool, Opacity tool and Mask tools.

3) "Tour de France" is a poster I created while in my first year at college, I used the Pen tool again when creating this piece of work but I believe my skills in Illustrator have improved vastly since I started work at university. 

4) "Peter Kay vector Illustration" I made this while at college in a project, the brief was to create a recognisable celebrity using Illustrator with the Pen tool and the Pencil tool. I believe that this has been successful everyone I have asked can easily recognise who the celebrity is. 

5) "Infographic" this was a project in college where we had to take something that interested us collect facts about whatever we chose that we were interested in and turn it into a visually stimulating piece of information. I chose to create it on Pool, since it's the sport I play I already had a lot of information this project was great. 

6) "Mr. Pepper wine bottle" a piece from my final major project at college, I created a company/restaurant called Mr. Pepper, I made the logo and the wine bottle design which i developed through Illustrator and Photoshop. 

7) Yorkshire Sculpture Park was a rebranding project, we took a trip there to get inspiration, I totally rebranded the park to make it more interesting to younger people, this was the poster I created. 

8) "Drip" a design I created in my free time, it wasn't planned I just wanted to make something using typography which demonstrated an idea. 

9) Rebrand of Yorkshire Sculpture Park, including the Logo, flyer and Poster. 

10) Shakespearian design using a sonnet of my choice, I created this design in mind of expressing the words of the sonnet or a singular line using imagery. I also added some words weaving between the trees and the whole design I went for was very sinister and dark which also represents the style of the sonnet which met the brief well. 

11) "ROTATION" my first time using the rotation tool after watching a 5 minute tutorial 
I created this. 

12) My logo for my Mr. Pepper I tried using different colours and fonts to experiment with the appearance of the logo. 


Tuesday, 25 November 2014

"Jukebox" a design created by me.

 This is a design I created using illustrator, inspired by swerve and his illustrations and how he uses backgrounds which inform about the foreground and the actual illustration. I was inspired by Swerve and some of the people I looked at for inspiration to create this design using the word JUKEBOX I used an exercise I found where I asked people to say the first thing that came into their head In this case I asked my dad to say the first word that came into his head which was jukebox. I created the different elements of my design using the pen tool on illustrator and made the box lettering using squares to make the text relevant to the actual design. I am most happy with the headphones because I feel that I have used the pen tool well to create the different dimensions and the shape of
the headphones.
 I am really happy with this test, I used the Pen tool to create the design making highlights and the earphones also using the pen tool, I used a reference image of earphones I found on google and created them around the BOX feature which I thin has added a new interest point and helps the design as a whole pop. 

Friday, 21 November 2014

ROTATION

This is a design I create in my spare time, it was my first time using the rotation tool on illustrator after finding a tutorial on youtube. I created anchor points in the middle of shapes and used geometric shapes with different set angles to create a measured rotation of shapes around my base shape which was a circle. I am very happy with how this has turned out, the design isn't completely finished but I now feel that I have a better knowledge of how the rotation tool works on illustrator and i feel that I can now use it in the future in my new design that I create. 

Artist Research- Behance

This is "Behance", I found a lot of Illustration that is influenced by the city on this page which is why I used it as inspiration on my project. The work I have focused on is road maps and how they are mapped out by in illustration purposes. 
This landmarking of historical sites and places of interest is a very good Idea I love the way they have presented the work in an actual road map which is in the city as shown in the 
bottom right hand picture.

They are influenced by the city because of how they know what city they are trying to design for and researching into what the historical background is of whatever it is they are designing for, for instance in the "Robot" design they have used actual robots they have illustrated to make the 
buildings, vehicles ect.. It is easy to tell that they have really done there research with there piece of work because of the detailed reflection of what they city is all about in there designs. 
We can see this in designs like "BeRLin" and the personalised LouLou and Tummie design they have created on my artist research page. 

Artist Research- "LouLou and Tummie" Illustration

LouLou and Tummie are Illustrators that create animations with the Illustrations they make, I love the simplistic look to there work which I feel benefits the animation I want to apply some of the simplistic style that I have gained inspiration from into my own work. 

New Idea - Fold out Illustration


This is one of my concepts, I had the idea of creating a fold out book to present my illustration on instead of just having the illustration on a flat piece of A3 paper. 
The fold out book offers another dimension to my illustration which I find interesting, I also think that this would allow my designs to flow better throughout the fold out book when you unfold the book you will see the entire illustration spread across a foldout which demonstrates the vastness of the city and how I show that in my illustrations. 

Thursday, 20 November 2014

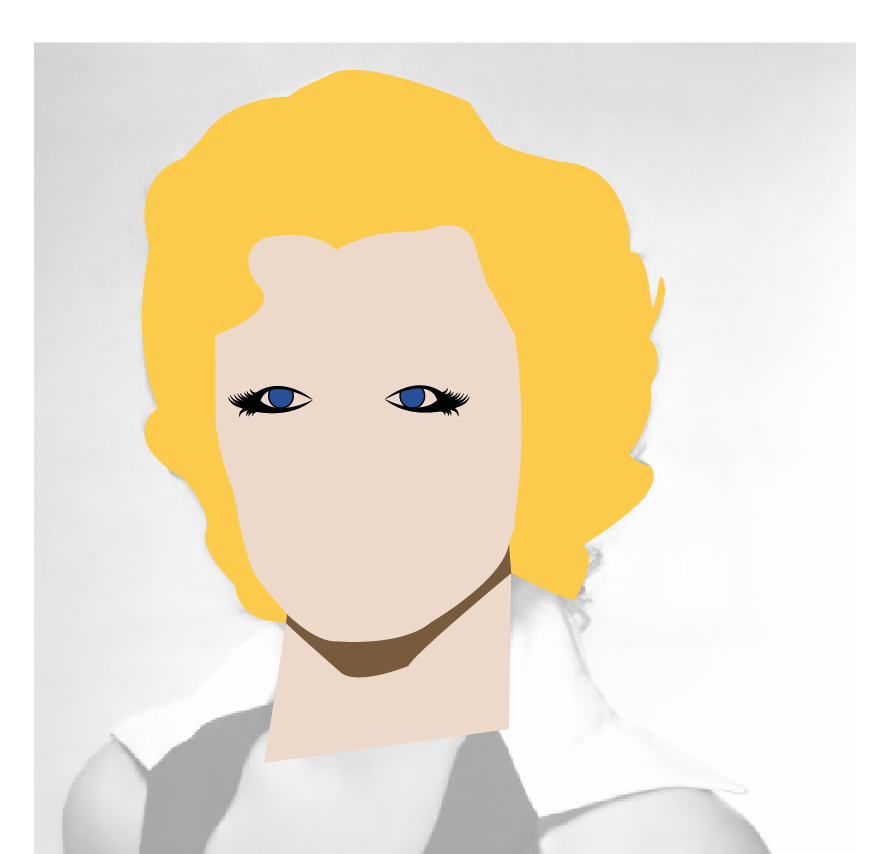
Adobe Illustrator vector: Marilyn Monroe

Marilyn Monroe


Step 1- We imported an image of Marilyn Monroe into a new document in Adobe Illustrator,we created a layer called "Facial Outlines" on this layer we proceeded to use the Pen tool to create the face and hair, without any fills. We then filled the basic outline of the face and hair in with two colours and cleaned up the design making sure there were no gaps in-between the hair and face.


Step 2- After we had created the basic outline we created the neck on the same layer by drawing a box like shape with the Pen tool I then coloured the neck the same colour as the face so they blended seamlessly together. Then I created a new layer above the facial outlines for the shadow which I also made using the Pen tool. I fixed any gaps between the shadow and the other objects by using the direct selection tool to fix various anchor point.


Step 3 - I created a new layer to start on the facial features and named the layer "Features" I deselected the face and hair so I only the original image was visible I then traced around the eye contour to create this eye shape.


Step 4 - I then created the eyelashes by creating a single curve and increasing the stroke, I then added a pointed effect to the eyelash so it didn't have a flat edge and actually looked like an eye lash. 
I created the bottom lashed by flipping the curve using Transform.


Step 4- I made a copy of the original eye and reflected it using transform, I adjusted the pupil so both eyes are looking in the right direction. 


Step 5 - I made an outline of the white of the eye and sent it to the back of the contour, I then made pupils using the ellipse tool and highlights using the same tool. 


Step 6 - I created the eyelashes using the Pen tool again increasing the stroke to 8 and then making the stroke cap a rounded edge to give the effect of an eyebrow. 


Step 7 - I made the lines for the nose using the pen tool using suggestive lines to mark out where the nose might be. 


Step8 - I made the lips using then pen tool adding a bright red for her lips and highlight were her lipstick is sparkling, this concluded my Marilyn Monroe illustration which I am overall very 
happy with. 

WORKSHOP WEEK_C4D PUTTING AN OBJECT INTO A FILM


This is what I created in a workshop in workshop week, using C4D and After effects we imported a simple object into an uploaded video which was taken in the Creative arts building of 
Huddersfield university and began to work on the work space by creating a shape. Once we created the shape we then put it into the video using after effects.


Thor - Speed Painting (#Photoshop Element) | CreativeStation


This is an Illustration by "Creative Station" I found via Youtube. 
He creates an incredible illustration of THOR using only the Pain brush tool in a time-lapse styled video! It took him 10 hours to complete the overall design and it was worth it in the end. The production process looks laborious but has worked well and the atmosphere and depth that has been created has worked well. He uses different colour techniques and strategies to create this illustration and gets it exactly right. What an amazing Illustration! 

SWERVE- "So Rich" Illustration and design process


"So rich" by SWERVE. 
I love this style of work he is doing at the moment, turning sketches and ideas digital and developing them on Adobe Illustrator. He uses the Pen tool for the majority of this design very well, he obviously has a great understanding of how Illustrator works. 
A lot of his work is based around creating Logo's and branding for clients, this is well demonstrated in this piece of work as we see him create a SPEEDART LOGO for "So rich". 

He also creates shadows and highlights using the Pen tool to make this design come to life! 

Wednesday, 19 November 2014

Perth Theatre


This is my next illustration, the Perth Theatre is a very small and quirky part of Perth which has a lot of character and influence on the city. The theatre has recently been renovated and upgraded but still has it's original style which I find very interesting and smart. 
This in itself shows a city In flux and is perfect to go onto my big illustration.